Showing posts with label encrusted crazy quilt. Show all posts

Nov 25, 2013

Encrusted Crazy Quilting Week 3

Back at week 2 we were looking at the finished pieced 12" block, with the addition of lace embellishments. Now at week 3 I continue by adding more trims, beads and buttons. Additional seam treatment with embroidery stitches have also been included.

  added gem beads, star sequins, more beads..


whipped back stitch in red & white
 Spidey on spider web with beads & button cluster
 silk flowers with bead center
daffodil flowers
completed corner with silk flower spray

Almost finished 12" block. Added piping and black
borders. this just needs to be mounted in a shadow
box and hung on display. It really is square but my
camera angle makes it look wonky :)

This block is more a mixed-media crazy quilt block. The class was teaching you how to do the flip-n-sew technique for building the block itself and embellishing it with what ever we wanted with our own design in mind. Like I said in the begining I learned allot from the class of what to do and what not. I'm happy with it and it is unique - OOAK Crazy Quilt Block.


Encrusted Crazy Quilting Week 2

Here is the finished 12" pieced block. At this point I'm not real sure I have enough contrast going, but plan on embellishing it with that in mind.


I did some layering here. Under the black lace is a fine gold lace. On top portion of these laces I added a red/gold ribbon.

Now I have added the white lace, gold ric rac, metallic blue trim and more black trims.


See how different it looks with the trims selected. They still hold my eyes attention, but now I really have long straight seams :(
The effect that I am looking for is the eye to be drawn to the main butterfly motif, and then in a circular movement around it. Time to get even more creative!

This embellishment was made with some lace, pearls and a cute little happy bug face button...

See how it helps catch your eye and the other components are moving around now, too. Note the trail of pearls and silk flowers in the lower right column are also helping to curve things.

 The chevron stitch was used over the red/gold ribbon trim which toned down the brightness.

I've learned a lot about adding trims and why to do and NOT- Since this crazy quilt block will be mounted in a picture frame, I don't have to worry about washing it or everyday wear and tear. I have used commercial sticky back trim which looks so pretty, but try to get a needle threw it even if your unhooped.... forget it! You have to get the pliers out for help pulling your thread through the fabric and trim. Due to this technique I will not be doing allot of fancy embroidery stitches throughout :(


Nov 24, 2013

Encrusted Crazy Quilting Week 1

After finishing my last project with the 3Sisters Art Cloth Dolls I decided to take another plunge into "needlework unknown".
I've always been a lover of Crazy Quilts and decided to take a class with Sharon b from Pintangle. as she was offering the class Encrusted Crazy Quilting. Yaaah!

Here is an excerpt about the class:
Encrusted Crazy Quilting offers students the opportunity to learn how to piece, develop and heavily hand embellish a crazy quilt block with hand embroidery and beading. Along the way we explore different embellishing techniques while solving design, composition and color issues.

Believe me, this class is more involved, like a college course verse on-line embroidery class. So glad I'm doing this and have the opportunity to do so.

Week 1
After reading and digesting this weeks material, it was now time to prepare the muslin foundation block and pull fabrics for the making of the block.

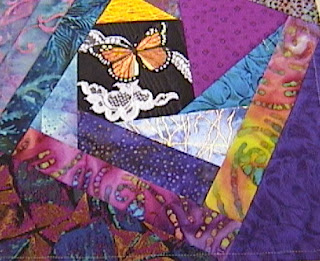
A colorway was the first concern, then the motif I would use in the center of the main block. As I have only been quilting with good quitters cotton, I didn't have any of the fancy fabrics and such. I decided on some pretty batik fabric and choose my colorway. Now I needed a motif for the center block and decided to use the pretty butterfly that had been waiting patiently in my stash box.

The center block is black moire with this pretty lace that I infused with MistyFuse. I choose the lace because it reminds me of embroidered lay stitches. I applied the cut lace with MistyFuse to hold it flat and prevent fraying all the while still leaving a soft hand to the fabric.

Now it was time to start adding patches to the block. We used the sew-n-flip technique much like paper piecing. I still get so turned around :)


I've made so many quilts with the paper piecing before, even a king sized quilt, why am I so confused? Could it be because I was trying to hard and was using the "old rules" - had to laugh at myself!
Actually I was ending up with to many long seams and was still thinking quilt piecing instead of crazy patchwork. I backed up, took everything out and started over. Now I had a better game plan and things were falling into place like they should!